Finding release in the low back
How are you reading this article right now? If you are reading on a cell phone or tablet, are you looking down? If you are looking at the computer, are your shoulders rounded forward? Are your abdominal muscles engaged (navel toward the spine?) Are you working with the pelvic floor every now and then? Does your head jut towards the computer ?
In this series of articles about passive yoga exercises, we explore how to counter the effects of our daily activities (think sitting in chairs and using cell phones) to find relief for an achy body. These exercises benefit “every body” from beginner to advanced yogis. Based on the principle of relaxing the spine before beginning a sequence of movements, these exercises will benefit those who sit a lot as well as those who are active and desire to move deeper into their practice. Through relaxation of the spine, we can create more space between the vertebrae, therefore creating more flexibility over time to move deeper into postures.
Keeping us younger by keeping our spines flexible.
The spine forms an “S” shape with its 3 natural curves of the cervical (neck), thoracic (mid back) and lumbar (low back) vertebrae. These curves are affected by our daily activities and postures. Over time, these curves can become modified from their natural position resulting in changes in our posture and in pain.
This pain is real but can often be elusive. Pain may appear in one part of the spine or body as a result of altered posture in another part of the body. Over time, this pain affects mind-body perception.
Yoga is a treasure of healing practices in the form of restorative and yin yoga poses. The regular practice of these therapeutic and corrective poses combined with the awareness of breath, assist us in reclaiming our natural posture and releasing pain.
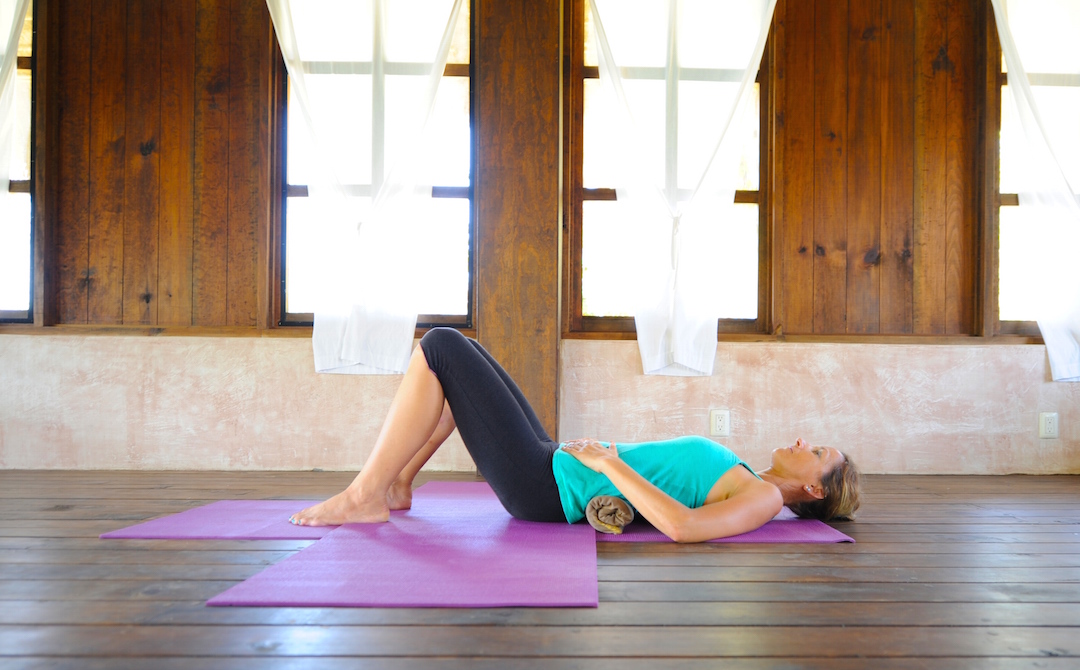
The low back passive exercise below releases muscles in the low back. As the muscles release, space is gained between the vertebrae. Over time, flexibility increases. This exercise should not be practiced by those with severe pain or known medical condition such as ruptured discs.
The work in this exercise is to release and relax as much as possible towards the cushion. Be aware of the rhythm of the breath. Notice if the breath becomes altered. If you feel tension, guide the breath toward the tension and imagine replacing the tension with the breath. Keep the face and jaw relaxed.
Passive Exercise 1: Releasing the low back
Step 1. For this first exercise, firmly roll a large towel or yoga mat so that the thickness is about 6 centimeters or 2.5 inches. The width should be at least the width of the body.
From sitting on the floor, place the roll on the floor to lightly touch the sacrum. Lean the body over the roll to bring the elbows to the floor. Bend the knees, leaving the feet on the floor keeping the feet and knees at hip-width apart. Relax the weight of the body here and begin releasing the lower back toward the roll. After a few breaths, slowly lower the back and upper body completely to the floor. Keep long, steady breaths and with each exhale, release the lower back more firmly to the roll.
Step 2. Interlace the fingers behind the head and lift the head, chin towards chest, with the weight of the head completely in the hands. Take 3 deep breaths and release the head to the floor keeping the chin towards the chest. If you find the chin is jutting to the sky or if you feel discomfort in the neck, you can use a thin cushion or blanket as support under the head. Release the hands to the abdomen, close the eyes, feel the natural flow of the breath.
Step 3. Next, push into the feet, firming up the legs, keeping the lower back and buttocks soft. Lift the pelvis to come one centimeter off of the roll. Hold here for 5 breaths releasing in the buttocks. Slowly bring the pelvis back to the roll and release completely. Repeat 3 times slowly with eyes closed. Stay 10- 20 minutes.
Step 4. When you are ready to leave this pose, push the feet firmly to the ground again and raise the pelvis with the strength of the legs towards the sky coming into Little Bridge Pose or Setu Bandha Sarvangasana. Take the cushion away. Lower slowly to the floor allowing each vertebra to come into contact with the floor starting with the neck. When you get the entire back on the floor, if you feel tension in the low back, you can push the sitz bones or sitting bones (or the lower end of the buttocks) towards the floor and hold for a couple of breaths before releasing the low back to the floor. Repeat the Little Bridge and low back release two more times.
Follow this with Thread the Needle for the Hips, Child’s Pose, Cat and Cow Pose before continuing with a hip-opening practice.
Retreats with Yoga Food Joy focus on acquiring inspiring exercises, renewing your practice and becoming passionately present. This pause in our daily activities helps us gain perspective on how our bodies can be healed. Our goal is to empower others by teaching basic, holistic care for the body.
Join us November 26th in Zipolite Mexico for 6 days of yoga, meditation and play.

